Table of Contents
Why Cleaning Your Cylinder Head Matters
The consequences of a dirty cylinder head include:
- Reduced engine power and efficiency — blocked ports restrict airflow, disrupting the air-to-fuel ratio
- Rough idling and misfires — carbon buildup around spark plug seats affects ignition
- Increased fuel consumption — the engine works harder to compensate for poor combustion
- Overheating — blocked coolant passages reduce the head’s ability to dissipate heat
- Undetected cracks — grease and soot can hide hairline fractures until they become catastrophic failures
Signs Your Cylinder Head Needs Cleaning
- Engine misfires or rough idling that doesn’t resolve with a tune-up
- Noticeable drop in power or acceleration
- Higher fuel consumption without a clear cause
- Overheating or coolant temperature running hotter than normal
- White or blue smoke from the exhaust
- Oil or coolant leaks around the head area
- Failed emissions test
What You'll Need: Tools and Materials
Tools:
- Socket wrench set and torque wrench
- Plastic scraper or wooden scraper (never metal on the mating surface)
- Wire brush (for cast iron heads) or nylon/soft-bristle brush (for aluminum heads)
- Rotary tool with small wire brush attachment (for tight areas)
- Valve spring compressor
- Compressed air and nozzle
- Large plastic tub or container
Cleaning Materials:
- Engine degreaser or parts cleaner
- Carburetor cleaner spray
- Chemical decarbonizer or carbon remover
- Clean shop rags or lint-free cloths
- Warm water for rinsing
Safety Gear:
- Safety glasses or goggles
- Chemical-resistant gloves
- Respirator or dust mask
- Work in a well-ventilated area
How to Clean a Cylinder Head: Step-by-Step
Step 1: Safety First — Prepare Your Workspace
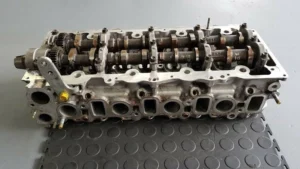
Step 2: Remove the Cylinder Head
- Drain the engine coolant
- Remove the intake and exhaust manifolds
- Remove the valve cover
- Disconnect any sensors, wiring, or hoses attached to the head
- Loosen and remove the cylinder head bolts in a criss-cross pattern (this prevents warping)
- Carefully lift the cylinder head off the engine block
Step 3: Pre-Cleaning Inspection
- Cracks — especially around the combustion chambers, valve seats, and coolant passages
- Warping — lay a metal straightedge across the mating surface to check for flatness
- Damaged threads — stripped bolt holes will need Helicoil inserts or professional repair
- Heavy carbon accumulation — note the worst-affected areas
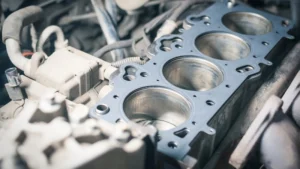
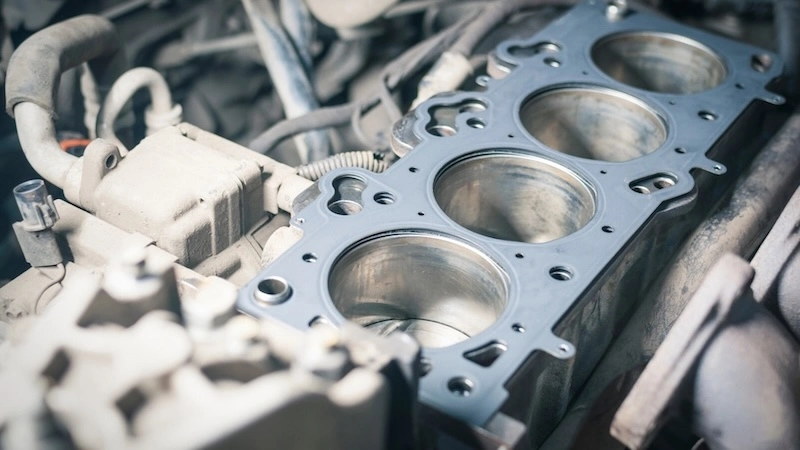
Step 4: Remove the Old Head Gasket Material
Step 5: Disassemble the Cylinder Head (for Deep Cleaning)
- Use a valve spring compressor to compress each spring
- Remove the keeper clips (also called valve locks or cotters)
- Lift out the valve springs, retainers, and valves
- Keep everything organized in a labeled tray — each valve should go back to its original seat
Step 6: Initial Cleaning — Remove Loose Debris
- wire brush (for cast iron) or nylon brush (for aluminum) to scrub the surface
- A rotary tool with a small brush attachment works well for combustion chambers and tight passages
- Apply light pressure — aggressive scrubbing can scratch surfaces
- Blow out loose debris with compressed air (always wear eye protection)
Step 7: Apply Engine Degreaser and Soak
Step 8: Scrub and Rinse
- Use your brush to scrub all surfaces, working the loosened deposits free
- Pay extra attention to the combustion chambers, valve ports, and oil passages
- For stubborn carbon patches, apply additional decarbonizer and let it sit before scrubbing again — multiple lighter passes are safer than one aggressive attempt
- Submerge the head in warm water to rinse away loosened grime and chemical residue
- Rinse thoroughly with clean water until no cleaner remains
Step 9: Clean the Valves and Valve Seats
- Use a wire brush and parts cleaner to scrub each valve, removing carbon from the stem and valve face
- For valve seats, use a valve lapping compound with a lapping tool to restore a smooth, even seal between the valve face and seat
- Inspect each valve for pitting, burning, or wear — damaged valves should be replaced, not just cleaned
Step 10: Dry the Cylinder Head Completely
- Wipe down all surfaces with clean, dry shop rags
- Use compressed air to blow through every passage — coolant channels, oil galleries, and bolt holes
- Let the head air dry in a warm, clean area for at least an hour
- Re-inspect passages with a flashlight to confirm they’re clear
Step 11: Final Inspection
- Check for cracks using a strong light (dye penetrant testing is more reliable for suspected hairline cracks)
- Check the mating surface for flatness with a precision straightedge — acceptable warpage is typically less than 0.05mm (0.002 inches); check your vehicle’s service specs
- Inspect valve guides for excessive wear using a micrometer
- Confirm all oil and coolant passages are clear
Step 12: Reassemble and Reinstall
- Lubricate the valve stems with engine oil before reinserting them
- Reinstall the valves, valve springs, retainers, and keepers using the valve spring compressor
- Install a new head gasket — never reuse the old one
- Lower the cylinder head onto the engine block carefully
- Tighten the head bolts in the specified sequence and torque values from your service manual (always use a criss-cross pattern and torque in stages)
- Reconnect manifolds, sensors, hoses, and wiring
- Refill the coolant system and check for leaks
Cleaning Methods Compared
| Method | Best For | Pros | Cons |
|---|---|---|---|
|
Chemical degreaser soak |
Light-to-moderate buildup |
Affordable, easy |
Time-consuming for heavy deposits |
|
Parts washer tank |
Moderate-to-heavy buildup |
Thorough coverage |
Requires equipment |
|
Ultrasonic cleaning |
Precision/performance heads |
Excellent for passages |
Professional equipment needed |
|
Glass bead blasting |
External surfaces only |
Fast, effective |
Doesn’t clean passages; requires masking |
|
Hot tank (caustic soda) |
Cast iron heads, heavy sludge |
Very effective |
Damages aluminum; professional use only |
How to Clean a Cylinder Head Without Removing It
Steps for in-situ cleaning:
- Allow the engine to cool and disconnect the battery
- Spray a carburetor cleaner or engine degreaser directly onto accessible areas of the cylinder head
- Use a soft-bristle brush to scrub visible surfaces, focusing on areas with visible deposits
- Wipe away loosened grime with a clean rag
- For carbon deposits on valve areas, fuel system additives (added to the fuel tank) can help dissolve light buildup through normal combustion
Common Mistakes to Avoid
- Using metal scrapers on mating surfaces — always use plastic or wood to avoid scratches
- Choosing the wrong cleaner for aluminum — caustic or highly alkaline products will corrode aluminum
- Skipping the post-clean inspection — cleaning can reveal hidden cracks; always inspect carefully
- Rushing the drying process — moisture trapped in passages causes rust and contamination
- Reusing the old head gasket — always install a new gasket during reassembly
- Incorrect torque sequence — always follow the manufacturer’s sequence and torque specs to prevent warping
When to Replace Instead of Clean
- Visible cracks in the combustion chamber, water jacket, or bolt holes
- Warpage beyond spec that cannot be corrected by machining (resurfacing)
- Severely damaged valve seats or burned valves throughout
- Eroded coolant passages that compromise sealing
Maintenance Tips to Keep Your Cylinder Head Clean Longer
- Use quality engine oil and change it on schedule — clean oil reduces sludge buildup inside the head
- Address coolant leaks immediately — mixed coolant and combustion gases accelerate deposit formation
- Use high-quality fuel — low-grade fuel produces more carbon during combustion
- Avoid frequent short trips — the engine doesn’t reach full operating temperature, leading to moisture and deposit buildup
- Consider fuel system additives periodically — formulated detergents can reduce carbon accumulation on valve ports
Final Thoughts
Cleaning a cylinder head is one of the most impactful maintenance tasks you can perform on a high-mileage engine. Done correctly, it restores combustion efficiency, extends engine life, and helps you identify hidden damage before it becomes a costly failure.
Whether you’re rebuilding a performance engine, restoring a classic vehicle, or simply maintaining your daily driver, the process outlined above gives you a reliable framework for a thorough, safe clean.
If you have questions about cylinder head specifications, replacement options, or sourcing quality components for your engine, feel free to contact our team — we’re here to help.
A clean cylinder head is the foundation of a healthy, efficient engine. Whether you’re doing routine maintenance or rebuilding after a failure, taking the time to clean and inspect properly will always pay off in the long run.
If you need a replacement cylinder head or have questions about your engine components, the team at XJX Auto Parts is ready to help — straight from the factory.