If you are rebuilding or reassembling a Toyota 2TR cylinder head, getting the torque specifications right is not optional — it is the difference between an engine that runs reliably for another 200,000 miles and one that blows a head gasket within weeks. This guide covers everything you need to know: the correct torque values, the tightening sequence, the tools required, and the common mistakes that lead to expensive failures.
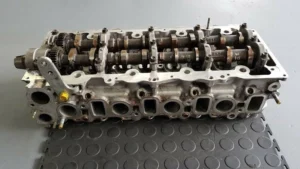
Whether you are working on a Toyota Tacoma, Hilux, Land Cruiser Prado, 4Runner, or Fortuner, the 2TR-FE engine is at the heart of your truck — and the cylinder head is one of its most critical assemblies.
What Is the Toyota 2TR-FE Engine?
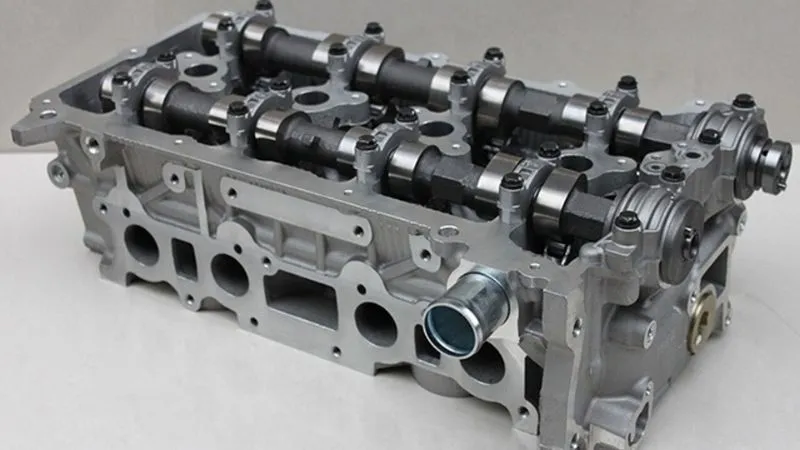
The Toyota 2TR-FE is a 2.7-liter inline-four gasoline engine that has been in production since 2004. It features a cast iron cylinder block paired with an aluminum alloy cylinder head, a dual overhead camshaft (DOHC) layout, four valves per cylinder (16 valves total), and Toyota’s Variable Valve Timing with intelligence (VVT-i) system. From 2015 onward, the updated version received Dual VVT-i on both the intake and exhaust camshafts.
The engine produces between 149 and 161 horsepower depending on the model year and market, with peak torque ranging from approximately 178 to 181 lb-ft. It is widely regarded as a durable, low-maintenance workhorse — but only when assembled correctly.
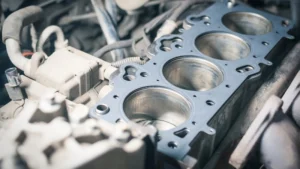
The aluminum cylinder head is central to the engine’s thermal efficiency. Aluminum dissipates heat faster than cast iron, which is why this design is so common in modern engines. However, aluminum is also far more sensitive to uneven clamping forces. An incorrectly torqued or unevenly tightened head can warp, leading to coolant or combustion gas leaks that are costly to repair.
Why Torque Specifications and Tightening Sequence Matter
Before getting into the numbers, it is worth understanding why these specifications exist in the first place.
The head gasket sits between the cylinder head and the engine block. Its job is to seal the combustion chambers, coolant passages, and oil galleries all at once — under extreme heat, pressure, and vibration. For the gasket to do this effectively, it needs to be clamped with consistent, even force across its entire surface. Too little torque and the gasket will leak. Too much torque and you risk stretching or snapping the head bolts, or warping the aluminum head itself.
This is why Toyota engineers specify not just a torque value, but also an angle-based tightening method for the 2TR cylinder head. Angle tightening (also called torque-to-yield tightening) provides more consistent clamping force than torque-only methods, because it accounts for variations in thread friction that can lead to inaccurate results with a torque wrench alone.
The tightening sequence — the order in which you tighten the bolts — matters just as much as the torque values. Bolts must be tightened from the center of the head outward in a cross pattern. This distributes the clamping force evenly as the gasket compresses, preventing localized stress that can warp the head.
2TR-FE Cylinder Head Bolt Torque Specifications
The following torque specifications are derived from Toyota’s official service repair manual for the 2TR-FE engine.
Cylinder Head Bolt Tightening Procedure (3-Step Method):
- Step 1: Tighten all cylinder head bolts to 39 Nm (29 ft-lb / 398 kgf-cm)
- Step 2: Turn all bolts an additional 90 degrees
- Step 3: Turn all bolts a final additional 90 degrees
The total angular rotation after the initial torque step is 180 degrees. This is a torque-to-yield (TTY) procedure, which means the bolts are designed to stretch slightly during assembly. Because of this, Toyota specifies that head bolts must be replaced with new ones any time the cylinder head is removed. Do not reuse the old bolts.
Important notes:
- Always use new head bolts. This is not a recommendation — it is a requirement. TTY bolts that have been previously stretched to their yield point cannot provide reliable clamping force if reused.
- Apply a light coat of clean engine oil to the bolt threads and under the bolt head before installation. Dry threads will give inaccurate torque readings.
- Do not use thread-locking compounds on the head bolts unless specifically instructed by the service manual.
- Ensure the mating surfaces of the head and block are completely clean and free of old gasket material, oil, and debris before assembly.
Additional 2TR-FE Torque Specifications
While the cylinder head bolts are the most critical, several other fasteners must be torqued correctly during a 2TR cylinder head rebuild. The table below summarizes the key specifications:
| Component | Step | Torque / Angle | Notes |
|---|---|---|---|
|
Cylinder head bolts |
Step 1 |
39 Nm / 29 ft-lb |
Initial torque |
|
Cylinder head bolts |
Step 2 |
+90° |
Angle tighten |
|
Cylinder head bolts |
Step 3 |
+90° |
Angle tighten |
|
Camshaft bearing caps |
Final pass |
~12 Nm / 9 ft-lb |
Must be in original positions |
|
Crankshaft bearing caps |
Step 1 |
39 Nm / 29 ft-lb |
— |
|
Crankshaft bearing caps |
Step 2 |
+90° |
Angle tighten |
|
Connecting rod caps |
Step 1 |
22 Nm / 18 ft-lb |
— |
|
Connecting rod caps |
Step 2 |
+90° |
Angle tighten |
|
Valve cover (cam cover) |
Final |
7–9 Nm / 62–80 in-lb |
Do not over-tighten |
|
Intake manifold bolts |
Final |
~30 Nm / 22 ft-lb |
Center-out pattern |
|
Exhaust manifold nuts |
Final |
~40 Nm / 30 ft-lb |
Re-check after heat cycle |
A few component-specific notes worth highlighting:
- Camshaft bearing caps: The caps are numbered and directional — each one must go back in its original position and original orientation. Swapping caps or reversing them will cause immediate camshaft binding or seizure.
- Valve cover bolts: These are far lower torque than most people expect. Over-tightening is extremely common and will crush the rubber gasket, leading to persistent oil leaks around the cam cover perimeter.
- Exhaust manifold nuts: After the engine has been run to full operating temperature and allowed to cool, it is worth re-checking these nuts. Heat cycling causes the exhaust manifold gasket to settle, and a small additional tightening pass is often needed to maintain the seal.
Tightening Sequence for the 2TR-FE Cylinder Head
The cylinder head on the 2TR-FE has 10 head bolts arranged in two rows along the length of the head. The correct tightening sequence begins from the center of the head and progresses outward in a cross pattern — this is consistent with Toyota’s standard procedure for aluminum-head engines.
The bolt positions can be visualized as a 2×5 grid (front of engine on the left):
| Row | Position 1 | Position 2 | Position 3 | Position 4 | Position 5 |
|---|---|---|---|---|---|
|
Top row (exhaust side) |
10 |
6 |
2 |
4 |
8 |
|
Bottom row (intake side) |
9 |
5 |
1 |
3 |
7 |
Tightening order: 1 → 2 → 3 → 4 → 5 → 6 → 7 → 8 → 9 → 10
Start from the center pair and work outward. Here is the step-by-step sequence to follow for all three tightening passes:
- Bolts 1 & 2 — Center of the head (one on each row). These are tightened first to begin compressing the gasket evenly from the middle.
- Bolts 3 & 4 — One position outward toward the timing chain end, alternating rows.
- Bolts 5 & 6 — One position outward toward the flywheel end, alternating rows.
- Bolts 7 & 8 — Second position outward toward the timing chain end.
- Bolts 9 & 10 — The outermost bolts at the flywheel end, completing the sequence.
Important rules for all three passes:
- Complete the full 10-bolt sequence before moving to the next step. Do not finish one bolt fully before moving on.
- Apply each step (initial torque, first 90°, second 90°) to every bolt in order before progressing.
- Never tighten from the outside inward — this traps stress in the gasket and is one of the most common causes of warping on aluminum heads.
Tools Required for This Job
Doing this job correctly requires the right tools. Using incorrect or cheap tools is one of the most common reasons head bolt jobs fail. Here is everything you need before you start:
- Torque wrench — A high-quality click-type or digital torque wrench accurate in the 20 to 60 Nm range. Have it calibrated if it has not been used recently. Inaccurate torque readings at Step 1 will throw off the entire procedure.
- Angle gauge (torque angle meter) — Essential for the 90-degree tightening steps. Do not attempt to estimate the angle by eye. A mechanical angle gauge that clips onto the ratchet head is affordable and far more reliable than guesswork.
- 12mm 12-point (bi-hex) socket — The correct socket size for the 2TR-FE cylinder head bolts. A standard 6-point socket may not fit properly on these bolt heads.
- Gasket scraper and surface cleaner — Use a plastic or soft metal scraper to remove old gasket material without gouging the aluminum head or iron block surfaces. Follow up with a dedicated surface cleaner and lint-free cloths.
- Straight edge and feeler gauges — Used to check cylinder head flatness before reassembly. Toyota’s allowable warp limit for the 2TR-FE head is 0.05 mm (0.002 in). Measure diagonally, longitudinally, and transversely. A head that exceeds this limit must be resurfaced or replaced.
- Clean engine oil — For lubricating bolt threads and the underside of bolt heads before installation. Do not use assembly grease or thread-locking compounds.
| Tool | Purpose | Why It Matters |
|---|---|---|
|
Torque wrench (20–60 Nm range) |
Initial torque step |
Establishes baseline clamping force |
|
Angle gauge |
90° + 90° tightening steps |
Ensures accurate TTY stretch |
|
12mm 12-point socket |
Driving head bolts |
Proper fit prevents rounding |
|
Straight edge + feeler gauges |
Head flatness check |
Catches warpage before reassembly |
|
Gasket scraper + surface cleaner |
Surface preparation |
Clean surfaces are critical for sealing |
|
Clean engine oil |
Bolt thread lubrication |
Prevents dry-torque inaccuracy |
Common Mistakes to Avoid
Even experienced mechanics get these wrong. Here are the questions that come up most often — and the answers that prevent costly failures.
Can I reuse the original head bolts if they look fine?
No. The 2TR-FE uses torque-to-yield (TTY) head bolts, which are designed to stretch slightly during tightening. Once stretched, the bolt cannot generate the same clamping force a second time. Reusing TTY bolts is one of the most common causes of premature head gasket failure. Always install new bolts — this is a Toyota requirement, not a suggestion.
Do I really need an angle gauge, or can I estimate 90 degrees by hand?
You need an angle gauge. Ninety degrees sounds straightforward, but even experienced mechanics are routinely off by 10 to 20 degrees when estimating by eye. On a TTY procedure where each angular step directly determines how much the bolt stretches, that margin of error can mean under-clamped bolts that allow the gasket to lift under load. An angle gauge costs very little compared to the labour of doing the job a second time.
Does the tightening sequence really matter if I reach the correct final torque?
Yes — significantly. Tightening from the outside in, or in a random order, creates uneven compression across the gasket surface. The gasket may appear to seal at first, but localized stress will cause it to fail once the engine reaches operating temperature and the head expands. Always follow the center-out cross pattern for all three passes.
What happens if the mating surfaces are not perfectly clean?
Even a thin film of old gasket material, oil, or debris on the block deck or head surface prevents the new gasket from seating with full contact. The result is a leak path that no amount of correct torque will fix. Thorough surface preparation is as important as the torque values themselves.
Is it necessary to check the head for warpage before reassembly?
Always. Installing a new gasket on a warped head is a guaranteed repeat failure. The 2TR-FE aluminum head can warp if the engine has overheated, even once. Check flatness with a straight edge and feeler gauges before assembly. If warpage exceeds 0.05 mm (0.002 in), the head must be resurfaced or replaced.
Does the head gasket have a specific orientation?
Yes. The head gasket has a defined top side and a front/rear orientation. Installing it incorrectly can block coolant passages, which will cause the engine to overheat within minutes of startup. Check the gasket markings and the service manual diagram before placing it on the block.
When to Replace the Cylinder Head Gasket
A failing head gasket on the 2TR-FE typically shows one or more of the following symptoms: white smoke from the exhaust (coolant burning in the combustion chamber), coolant loss without any visible external leak, oil contaminated with coolant (milky brown oil on the dipstick), overheating, or bubbles visible in the coolant reservoir when the engine is running.
If you observe any of these signs, the head gasket should be inspected as soon as possible. Continuing to run an engine with a blown gasket can lead to warped or cracked cylinder heads, damaged pistons, and complete engine failure — a far more expensive repair than replacing the gasket promptly.
Reassembly Tips for Long-Term Reliability
After torquing the cylinder head correctly, there are a few more steps that determine how well the engine will perform over the long term.
Allow the engine to reach full operating temperature before pushing it hard. On the first startup after a head job, monitor coolant temperature closely and check for any signs of leaks or unusual exhaust smoke. Some mechanics also recommend re-checking head bolt torque after the first heat cycle — while this is not specified in Toyota’s official procedure for TTY bolts, it is a reasonable precaution if you want extra confidence.
Use a high-quality coolant that meets Toyota’s specifications (Toyota Super Long Life Coolant or equivalent). Flush and refill the cooling system completely to remove any air pockets that could lead to localized overheating.
Change the engine oil after the first few hundred miles of operation following a head rebuild. Metal particles and assembly lubricants can contaminate the fresh oil, and starting the break-in period with clean oil is always the right choice.
Sourcing a Replacement 2TR Cylinder Head
If your cylinder head inspection reveals cracks, excessive warpage, or damaged valve seats that cannot be repaired economically, a replacement head is the next step. When sourcing a replacement 2TR cylinder head, look for a supplier that can verify the head has been pressure-tested, that the valve seats and guides have been inspected, and that the mating surface is within specification.
For B2B buyers — workshops, fleet operators, and engine rebuilders — working directly with a manufacturer or factory supplier rather than a distributor can significantly reduce costs on volume orders while ensuring consistent quality.
At Xinjin Auto Parts, we supply engine components including cylinder heads directly from our factory. If your operation requires a reliable supply of 2TR and other engine parts, feel free to contact us — we are happy to discuss your requirements.