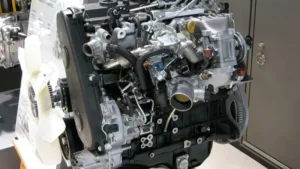
In the world of heavy-duty diesel engine repair, there is a narrow margin between a professional rebuild and a catastrophic failure. Among the various tasks a technician performs, the cylinder head tightening procedure stands as one of the most critical. While it may seem like a straightforward process of driving bolts into a block, the physics involved in creating a high-pressure seal between the cylinder head, the gasket, and the engine block is incredibly complex.
For fleet managers, independent mechanics, and heavy machinery owners, understanding the “why” and “how” of this procedure is the key to avoiding the dreaded blown head gasket or a cracked casting. This comprehensive guide explores the engineering principles, the step-by-step execution, and where to find the essential data to do the job right.
The Engineering Behind the Torque: Why Precision Matters
A diesel engine operates under immense internal pressure. Unlike gasoline engines, diesels rely on high compression ratios to ignite fuel. This creates an environment where the cylinder head is constantly trying to “lift” away from the engine block during the combustion stroke. The only components preventing this separation are the cylinder head bolts.
The Concept of Clamping Force
The primary goal of any tightening procedure is to achieve a uniform clamping force. This is the total pressure exerted by the bolts to compress the head gasket. If this force is uneven, the gasket will fail to seal the combustion chambers, oil galleries, and coolant passages. Even a microscopic gap can lead to high-pressure gases eroding the metal surfaces.
Thermal Expansion and Contraction
Engine components are dynamic. As a diesel engine reaches its operating temperature, the cylinder head and the block expand at different rates depending on their material, such as grey iron or compacted graphite iron. A properly executed tightening sequence ensures that the assembly can withstand these thermal cycles without losing its seal or warping the metal.
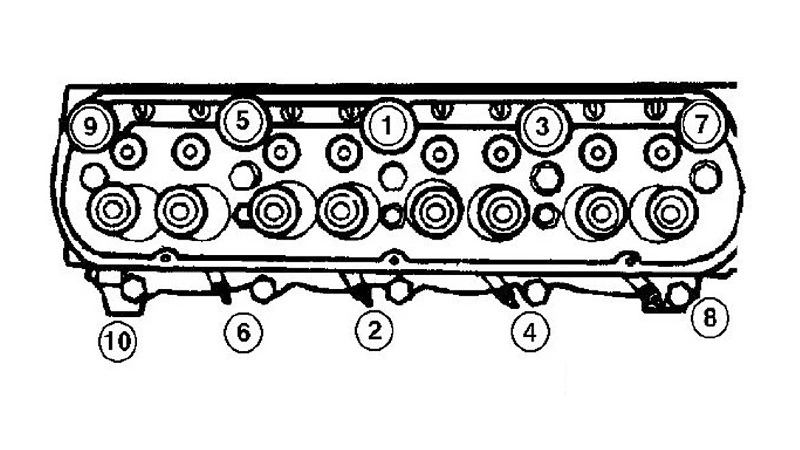
Understanding the Tightening Sequence: The Center-Out Philosophy
If you were to tighten the bolts on one side of the cylinder head completely before moving to the other, you would essentially be tilting the head. This creates a “bowing” effect in the center, much like a bubble trapped under a screen protector. To prevent this, manufacturers dictate a specific tightening pattern.
Most heavy-duty engines, whether from Cummins, Caterpillar, or Komatsu, follow a spiral or crisscross pattern:
- Starting at the Center: The innermost bolts are tightened first to “seat” the head firmly against the block.
- Expanding Outward: By moving toward the ends of the head in a specific sequence, you “push” any potential irregularities or gasket slack toward the outer edges.
- Ensuring Flatness: This method minimizes the risk of cylinder head warping, which is the leading cause of premature engine failure after a rebuild.
How and Where to Find the Correct Cylinder Head Tightening Sequence?
One of the most common questions in the workshop is: “Where can I find the correct bolt sequence for this specific engine?” Relying on memory is a dangerous game in diesel mechanics. Specifications change with engine serial numbers and updated gasket designs.
1. Factory Service Manuals (FSM)
The gold standard for any repair is the Original Equipment Manufacturer (OEM) service manual. These documents provide the exact torque values (in Nm or Ft-Lb) and the specific degrees of rotation required for torque-to-yield bolts.
2. Gasket Manufacturer Instruction Sheets
When you purchase a high-quality head gasket set, the manufacturer (such as Victor Reinz or Fel-Pro) often includes a technical sheet inside the box. Since the gasket’s material composition dictates the required clamping force, these sheets are sometimes more up-to-date than old service manuals.
3. Digital Databases and Repair Platforms
Platforms like Mitchell 1, ALLDATA, or Cummins QuickServe are invaluable for modern shops. They provide searchable databases where you can input the Engine Serial Number (ESN) to pull up the exact tightening diagram.
4. Casting Markings and Tech Bulletins
Occasionally, manufacturers release Technical Service Bulletins (TSBs) that revise original torque sequences to address known field failures. Always check if a TSB exists for your engine model before beginning the assembly.
Tools of the Trade: Calibrating for Success
You cannot achieve a professional-grade seal with a standard wrench and guesswork. The tools used in the cylinder head tightening procedure must be high-quality and recently calibrated.
- Click-Type Torque Wrenches: The most common type, allowing technicians to set a specific limit. However, they must be stored at their lowest setting to maintain spring tension accuracy.
- Digital Torque Angle Meters: Modern engines often require a specific degree of rotation after the initial torque is reached. Digital meters provide the highest level of accuracy for these “Torque-to-Yield” requirements.
- Thread Chasers: Before installation, the bolt holes in the engine block must be cleaned. Using a thread chaser (not a cutting tap) ensures that the torque readings accurately reflect the actual clamping force, rather than the friction caused by debris in the threads.
Step-by-Step Execution of a Cylinder Head Installation
A successful installation requires a disciplined, multi-stage approach. Never attempt to reach the final torque specification in a single pass.
Stage 1: Preparation and Inspection
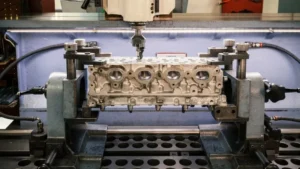
Before the head even touches the block, both surfaces must be surgically clean. Use a precision straightedge and feeler gauges to check for flatness across the block and the head. If the deviation exceeds the manufacturer’s limit (often as little as 0.05mm), the surfaces must be machined.
Stage 2: The Initial "Snug" Pass
Place the head and gasket carefully. Following the official sequence, tighten all bolts to a low, initial torque value (e.g., 50 Nm). This settles the gasket into place without over-stressing any single point.
Stage 3: The Intermediate Pass
Increase the torque to the next specified increment. This begins the actual compression of the gasket fire rings. Again, follow the sequence strictly. Some engines may require three or four intermediate steps to reach the final torque.
Stage 4: The Final Torque or Angle
Many modern diesel engines utilize Torque-to-Yield (TTY) bolts. These bolts are designed to stretch slightly to provide a constant clamping force. After reaching a baseline torque, the manufacturer may require an additional “90-degree turn.” This stage is critical; if you under-tighten, the seal will leak; if you over-tighten, the bolt may snap or the threads in the block may strip.
Common Pitfalls: What Could Go Wrong?
Even experienced mechanics can make mistakes that lead to engine rework. Recognizing these risks is the first step in prevention.
- Reusing TTY Bolts: Torque-to-Yield bolts are “one-time use” components. Because they undergo plastic deformation (stretching) during the final tightening stage, they lose their elasticity. Reusing them will result in insufficient clamping force, even if your torque wrench says otherwise.
- Hydraulic Lock in Bolt Holes: If oil or coolant is left in the bottom of a blind bolt hole, the bolt will compress the liquid as it is tightened. Since liquids are incompressible, this can crack the engine block or give a false torque reading.
- Incorrect Lubrication: Some specifications require bolts to be “lightly oiled,” while others require dry threads or specific anti-seize compounds. Friction at the threads can account for up to 90% of a torque reading; if the lubrication is wrong, your torque wrench will “click” before the bolt is actually tight enough.
The Critical Link Between Procedure and Parts
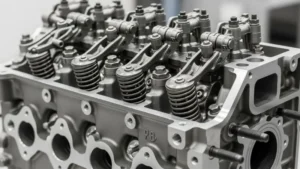
While the tightening procedure is vital, even the most perfect execution cannot compensate for a low-quality casting. The integrity of the cylinder head—specifically the thickness of the deck and the quality of the alloy—determines how well the component will resist warping under the immense clamping forces we have discussed.
Sourcing your components from a manufacturer that understands these metallurgical requirements is the best insurance policy for your engine. High-quality parts are designed to handle the stress of the tightening sequence and the thermal shocks of daily operation, ensuring that your labor results in a long-lasting repair.
Summary
The cylinder head tightening procedure is a marriage of mechanical skill and engineering theory. By strictly adhering to the manufacturer’s sequence, using calibrated tools, and ensuring a clean environment, you guarantee the structural integrity of the engine. Whether you are working on a heavy-duty truck or industrial power generation equipment, precision in this area is the most effective way to reduce downtime and maintenance costs.
As a leading factory in the diesel engine industry, XinJin Auto Parts provides precision-engineered cylinder heads built to withstand the most rigorous installation standards. If you need reliable components or technical guidance for your next project, feel free to contact us for professional support.