Maintaining an engine block in clean condition is a critical step in mechanical servicing, restoration, or building. Whether it’s a cast‑iron block from a classic rebuild or an aluminum block fresh off machining, a clear and professional cleaning process will improve longevity, ensure proper engine assembly, and help identify cracks, corrosion, or damage. Below is a comprehensive, step‑by‑step guide that covers cleaning both internal passages and external surfaces, safety precautions, and advanced options. This article is ideal for enthusiasts, mechanics, and anyone seeking trustworthy guidance on engine block cleaning.
Why Proper Block Cleaning Matters
Cleaning an engine block is far more than a cosmetic task — it’s a critical process that directly affects the success of any engine rebuild or maintenance project. A thoroughly cleaned block lays the foundation for reliable performance, long-term durability, and precision assembly. Here’s why it’s essential:
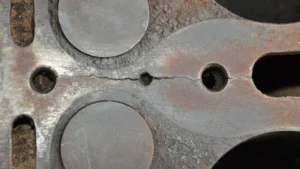
Reveal underlying defects
Grime, rust, oil residue, and scale can easily conceal structural damage within the engine block. Once the block is properly cleaned, it’s possible to inspect it thoroughly for cracks, pitting, corrosion, and machining flaws that would otherwise remain hidden. This inspection step is vital before machining or reassembly.
Prevent internal contamination
Residual debris, gasket remnants, or hardened sludge within coolant passages and oil galleries can severely compromise an engine’s operation. Clogged passages reduce fluid flow, elevate operating temperatures, and create points of failure. Cleaning ensures these systems are completely free of old deposits that might impair lubrication or heat dissipation.
Support proper engine performance and long-term reliability
A clean engine block allows for precise measurements and smooth mating surfaces. It improves sealing at head gaskets and main caps, enhances heat exchange efficiency, and reduces the risk of corrosion during engine operation. When contaminants are removed, the risk of future mechanical issues—such as oil pressure loss or uneven thermal expansion—is significantly reduced.
Initial Preparation and Safety Measures
Before diving into the actual cleaning process, it’s important to set up the work environment properly and take the right precautions. This stage not only ensures better cleaning results but also protects the technician and the engine block from unnecessary risk.
Create a safe and well-ventilated workspace
Solvents, degreasers, and rust removers often contain volatile compounds that can be hazardous in confined spaces. Whether working in a home garage or professional shop, make sure the area is well-ventilated. Outdoor setups or workstations equipped with fans and exhaust systems are ideal. If indoors, wear a respirator when using strong chemicals to avoid inhaling fumes.
Protect sensitive surfaces and internal passages
Engine blocks have multiple critical surfaces that should not come into contact with aggressive cleaners or abrasive debris. Use rubber plugs, tape, or plastic caps to seal off oil galleries, coolant passages, and threaded holes. Mask machined surfaces—such as the deck, main bearing saddles, and cylinder bores—especially if blasting or soaking is involved, to prevent scoring or corrosion.
Remove all loose debris before wet cleaning
Before applying any cleaning agents, it’s wise to eliminate surface contaminants such as dust, metal shavings, old gasket materials, and carbon flakes. Use compressed air, a vacuum, or a soft-bristle brush to dislodge and remove debris from the exterior and visible cavities of the block. This not only makes the chemical cleaning step more effective but also reduces the risk of particles embedding into surfaces during scrubbing or rinsing.
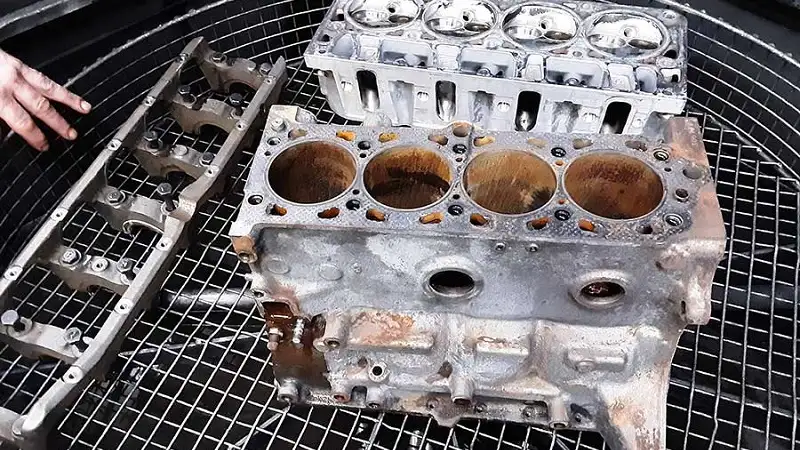
Methods for Cleaning an Engine Block: Step-by-Step Guide
Cleaning an engine block isn’t a one-size-fits-all operation. The approach should depend on the material of the block (cast iron or aluminum), the level of contamination, and whether the cleaning is being performed in a DIY environment or a professional machine shop. In this section, we break down the most effective cleaning methods—ranging from basic degreasing to advanced treatments—and how to apply them properly.
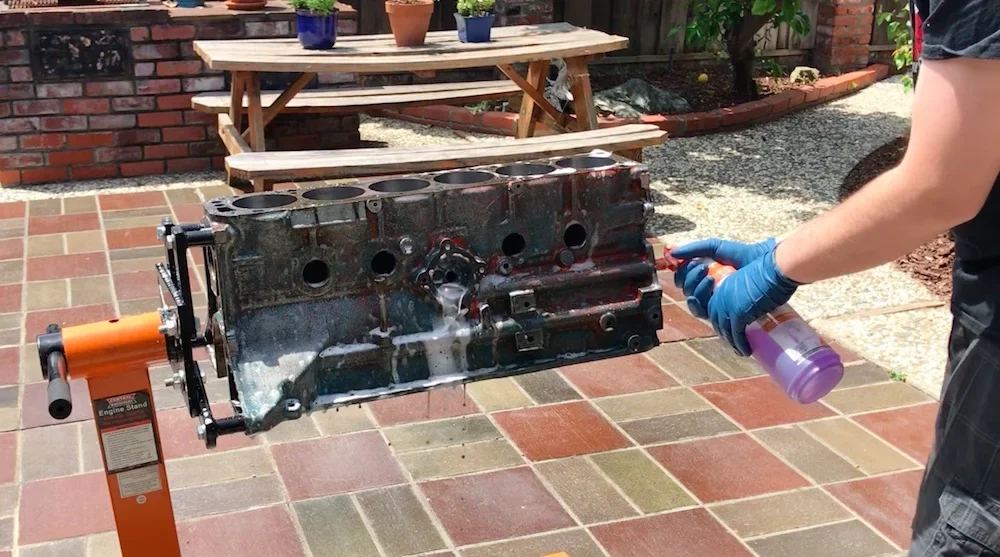
Step 1: Degreasing the Exterior
Before tackling internal passages, it’s important to remove the bulk of the grime and oil from the outside of the engine block.
- Choose the right degreaser:For cast iron, standard petroleum-based degreasers or water-based alkaline solutions are both effective. For aluminum, always use aluminum-safe degreasers to avoid surface etching or discoloration.
- Apply and dwell: Spray the degreaser generously across the block, focusing on areas with heavy sludge buildup. Let it sit for 10–15 minutes to break down oils and grime. During this period, use a stiff nylon or brass brush to agitate stubborn deposits without scratching the surface.
- Rinse thoroughly: Use a hose or low-pressure sprayer to rinse off loosened contaminants. Avoid high-pressure washers at this stage unless you’re masking critical areas, as too much force may push water into passages or damage soft metals.
Step 2: Internal Passage Cleaning
With the outer grime removed, turn your attention to the internal oil and coolant galleries—areas that are often neglected but critically important.
- Flush with hot soapy water: Fill a bucket with hot water and a grease-cutting detergent. Use flexible bore brushes to reach deep into oil galleries, cylinder bores, lifter bores, and freeze plug holes. Scrub thoroughly in multiple directions.
- Targeted solvent cleaning: For deeper carbon deposits, apply a targeted parts cleaner or kerosene into the galleries using a syringe or spray tube. Let it soak, then agitate with brushes. This is especially useful for old or neglected engines with baked-on sludge.
- Blow out with compressed air: After flushing, use compressed air to blow out each passage—this is essential for removing trapped water, loosened debris, and any residual solvent. Pay special attention to oil galleries and threaded bolt holes, which tend to trap liquid.
Step 3: Rust and Scale Removal
Especially in older or poorly maintained engine blocks, rust and mineral deposits can build up inside water jackets or on the block’s outer surface.
- Use a chemical rust remover: Soak the affected area with a rust-dissolving solution like phosphoric acid-based cleaners or dedicated rust converters. Allow it to dwell, then scrub using wire brushes or scouring pads.
- Avoid acidic cleaners on aluminum: If working with aluminum blocks, avoid strong acids entirely. Instead, opt for mild cleaners or mechanical methods like nylon pads to remove oxidation without damaging the soft metal.
- Rinse and neutralize: After removing rust, neutralize any chemical residues with a baking soda solution or a dedicated neutralizing rinse, then flush again with water.
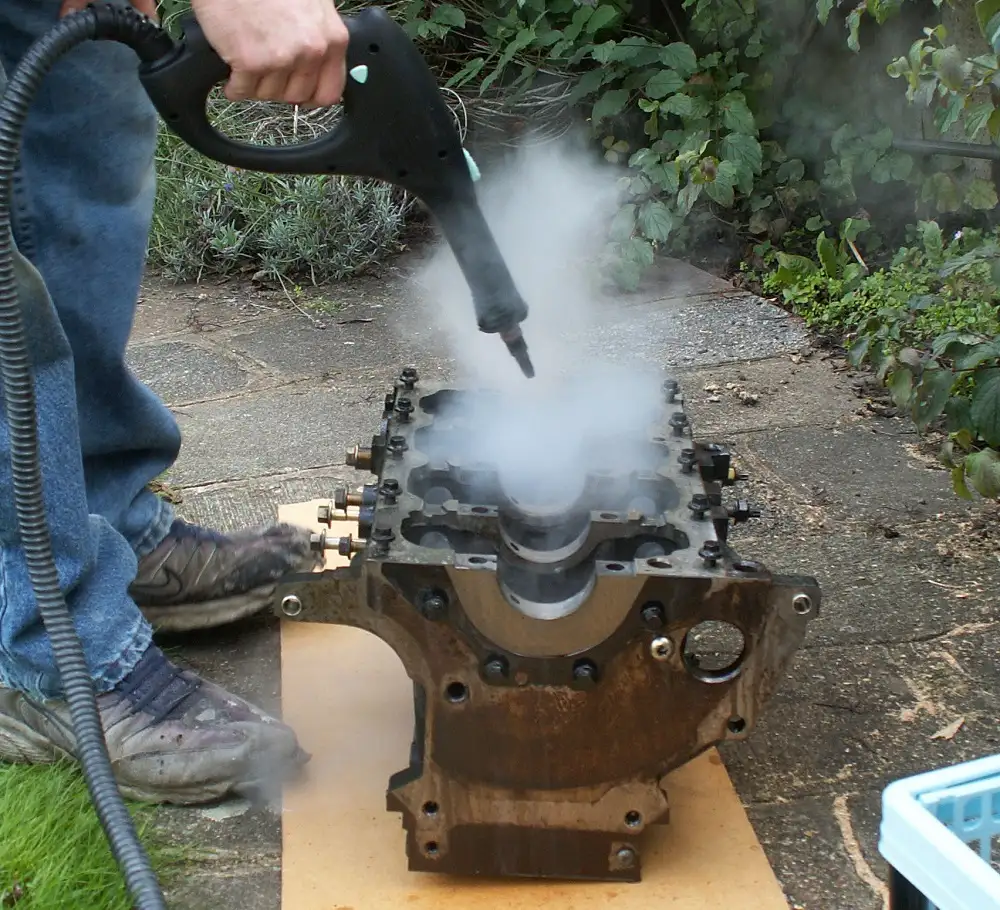
Step 4: Advanced Cleaning Options (Optional but Recommended)
For those with access to professional facilities—or for engine blocks undergoing full rebuilds—advanced cleaning methods can save time and deliver superior results.
- Hot tank cleaning: Common in machine shops, hot tanking involves soaking the block in a heated caustic solution that dissolves grease, paint, rust, and carbon. It is highly effective for cast iron but not suitable for aluminum.
- Steam cleaning: Steam penetrates small crevices and removes oil and carbon without the use of chemicals. It’s ideal for a mid-level clean and reduces environmental waste.
- Ultrasonic cleaning: Using high-frequency sound waves in a detergent bath, this method can reach internal cavities better than brushes or sprays. It’s especially useful for complex castings or heavily contaminated blocks.
- Dry ice blasting: An advanced, dry, non-abrasive cleaning method that removes dirt, grease, and coatings without leaving residue or damaging sensitive surfaces. Excellent for aluminum or high-performance engine blocks.
Step 5: Final Rinse and Drying
Once all contaminants have been removed, the block must be rinsed and dried quickly to prevent flash rust.
- Use warm water for the final rinse: Warm water helps flush away both cleaner residues and microscopic debris. Ensure that all traces of degreasers, rust removers, and soap are fully washed off.
- Dry with compressed air: Blow out every gallery, thread, and recess with compressed air. Keep the nozzle moving to avoid trapping moisture, and repeat until no water mist remains.
- Apply protective coating: Lightly coat machined surfaces and cylinder walls with a thin film of protective oil or assembly lube. This prevents surface rust while the block awaits machining or reassembly.
| Material | Suitable Methods | Avoid These |
|---|---|---|
|
Cast Iron |
Hot tank, wire brushing, acid cleaners |
None, except on sensitive areas |
|
Aluminum |
Steam, ultrasonic, mild detergents |
Acidic or caustic chemicals |
Pro Tip: Cleaning Freeze Plug Holes
Many contaminants accumulate behind freeze plugs. If you’re doing a full rebuild, remove these plugs and use flexible brushes to clean inside the cavities. This step is often overlooked and can make a huge difference in cooling system reliability.
Engine Block Cleaning Without Full Disassembly
While a full teardown and deep cleaning deliver the most comprehensive results, there are situations where the engine block remains mounted, such as during cosmetic detailing or routine maintenance. In these cases, proper external cleaning paired with smart aftercare can still offer real benefits for engine reliability and presentation.
Exterior Cleaning While Engine Is Mounted
When performing a cosmetic clean or under-hood detail, it’s important to avoid damage to sensitive electronics and seals:
- Use mild degreasers and hand tools: Choose a spray-on engine degreaser that’s safe for painted or plastic surfaces. Gently agitate grime with soft brushes or microfiber cloths. Avoid using harsh solvents that could damage wire sheaths, rubber gaskets, or painted finishes.
- Avoid high-pressure water: High-pressure jets can force water into electrical connectors, coil packs, and intake components. A low-pressure rinse or spray bottle is safer and still effective when used alongside good brushing.
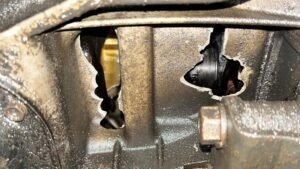
- Cover vulnerable parts before rinsing: Use plastic bags or purpose-built caps to cover the alternator, fuse box, air intake, battery terminals, and exposed sensors. Remove coverings only once everything is dry.
- Dry thoroughly: After rinsing, blow dry the engine bay using compressed air or a leaf blower. This prevents corrosion and avoids pooling in crevices or under electrical plugs.
After-Cleaning Maintenance and Storage
Whether the block was cleaned while assembled or stripped down, post-cleaning care is essential to protect your work and ensure trouble-free reassembly.
- Apply protective oil coatings: For bare metal surfaces—like cylinder bores, main caps, or gasket seats—use a light film of engine oil or fogging spray to prevent flash rust. This is especially important in humid climates or if the engine won’t be assembled right away.
- Use protective wrapping: Store the cleaned engine block in a sealed plastic bag or wrap it in a lint-free oiled cloth. Avoid direct exposure to dust, moisture, or fluctuating temperatures, which can reintroduce contaminants.
- Periodically rotate or inspect stored blocks: If the engine will be stored for weeks or months, inspect it periodically for signs of condensation, corrosion, or pests. Turn the crank slightly to prevent dry spots in coated bores.
- Avoid introducing debris post-cleaning: Keep the cleaned block away from machining dust, grinding workstations, or foot traffic to prevent new contaminants from settling on sensitive surfaces.
| Cleaning Method | Best Use Case | Key Advantages | Limitations |
|---|---|---|---|
|
Hot Tank Cleaning |
Full teardown and rebuild projects |
Deep cleaning of oil, paint, and rust |
Not suitable for aluminum, shop-only |
|
Manual Degreasing + Rinse |
Home garage cleaning or prep work |
Affordable, controllable, flexible |
Time-intensive, may miss internal deposits |
|
Steam or Pressure Rinse |
Engine bay or exterior degreasing |
Quick, good for surface grime |
Risk to sensors or wiring if unprotected |
|
Dry Ice Blasting |
Aluminum blocks or electronics nearby |
Residue-free, surface safe, non-abrasive |
Requires specialized equipment |
|
In-Vehicle Spray Cleaning |
Routine visual maintenance or detailing |
Fast and accessible for minor buildup |
Doesn’t clean internals, limited effect |
Checklist Before Engine Assembly
Before assembling your cleaned engine block, it’s crucial to verify its readiness. A single contaminant or flaw can affect performance, so follow this comprehensive checklist:
Visual and Surface Inspection
- Crack and Surface Check: Use a bright light to inspect all surfaces, bolt holes, and edges for hairline cracks or pitting.
- Rust and Scale Confirmation: Ensure no corrosion or scaling remains, especially near coolant passages or cylinder walls.
- Surface Flatness: Confirm deck surface flatness with a straightedge and feeler gauge; uneven surfaces lead to sealing issues.
Passage Cleanliness
- Oil Galleries: Use a rifle brush or gallery brush with solvent, then flush using compressed air until fully clear.
- Coolant Passages: Ensure there is no remaining sediment or rust scale. Use distilled water for a final rinse to prevent mineral residue.
- Bolt Holes: Clean out threads using a tap or thread chaser, and blow out with air to remove old thread locker or grime.
Machined Surfaces Protection
- Tape or Cap Removal: If you masked areas during cleaning, remove all protection and verify that no residue remains.
- Lubrication: Apply light assembly lube or rust-preventive oil to machined areas if immediate assembly is not taking place.
Final Clean Environment
- Lint-Free Area: Assemble in a clean, dust-free environment. Use clean gloves to handle internal engine components.
- Component Prep: Confirm pistons, bearings, crankshaft, and cylinder head have also been properly cleaned and pre-inspected.
- Tool Cleanliness: Ensure torque wrenches and measuring tools are free from oil and debris to avoid contamination during torquing or measurement.
Final Thoughts
A properly cleaned engine block is essential for precision assembly and long-term engine reliability. Residual oil, carbon, rust, and machining debris—even in trace amounts—can compromise component seating, restrict coolant or oil flow, and lead to premature wear or failure. That’s why effective engine block cleaning isn’t just cosmetic—it’s a prerequisite for accurate measurement, reliable sealing, and optimal thermal performance.
Each cleaning method—from solvent soaking and pressure washing to thermal cleaning and dry-ice blasting—offers specific advantages depending on the material type, contamination level, and workshop capabilities. Cast iron blocks may benefit from hot-tank or caustic cleaning, while aluminum blocks require gentler methods to avoid surface etching or corrosion. Post-cleaning inspection using compressed air, borescopes, or dye penetrants ensures that internal galleries, bolt holes, and deck surfaces are truly ready for the next step.
Ultimately, investing the time and technique into thorough engine block cleaning sets the stage for a stable build, minimizes failure points, and supports consistent performance under load. It’s not just preparation—it’s precision engineering in practice.
Frequently Asked Questions
1. Can I clean an engine block without disassembling the engine?
It’s possible to perform external cleaning without disassembly, using degreasers and pressure washers. However, internal passages—especially coolant and oil galleries—cannot be effectively cleaned unless the engine is disassembled. For rebuild-quality cleaning, full disassembly is essential.
2. Is it possible to clean an engine block at home?
Yes, with proper tools and safety measures, you can clean an engine block at home. Use a quality degreaser, wire brushes, and pressure washers for external surfaces. For internal passages, consider chemical flushing. Just ensure you have a well-ventilated workspace and proper disposal methods for hazardous waste.
3. What’s the safest way to clean aluminum engine blocks?
Aluminum is sensitive to corrosive chemicals and aggressive abrasives. Use non-acidic degreasers and nylon or brass brushes. Avoid oven cleaners or harsh solvents, which can pit the surface. Always rinse thoroughly and dry immediately to prevent corrosion or water spotting.
4. Should I clean a brand-new aftermarket engine block?
Absolutely. Even new blocks may contain machining debris, packing oils, or casting residue. A thorough cleaning—especially of oil and coolant passages—is recommended before any assembly to avoid contamination-related failures.
5. How do I know if coolant passages are fully clean?
Use high-pressure water flow or air pressure to flush coolant passages. A clean passage should flow freely without backpressure or restriction. For visual inspection, use an inspection scope or bright light to check for scaling, rust, or debris. Repeat flushing until water exits clear and without obstruction.
6. What are the risks of not cleaning an engine block properly?
Improper cleaning can leave behind debris, metal shavings, or contaminants that damage bearings, clog oil passages, or cause overheating. This leads to premature engine wear, loss of compression, or complete engine failure. Cleaning isn’t optional—it’s foundational to engine reliability.