Replacing a cylinder head is often regarded as one of the most significant milestones in a mechanic’s journey. Whether you are a seasoned DIY enthusiast or a professional technician, this task represents a deep dive into the heart of the internal combustion engine. It is a labor-intensive process that demands precision, patience, and a meticulous eye for detail.
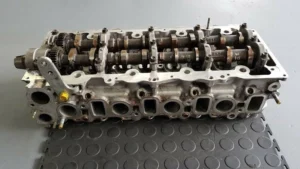
The cylinder head is a critical component that sits atop the engine block, housing the valves, spark plugs, and often the camshafts. Its primary role is to seal the combustion chambers and facilitate the flow of air and fuel into the cylinders while allowing exhaust gases to exit. When this component fails—due to overheating, cracking, or a blown head gasket—the performance of your vehicle is compromised, and the risk of catastrophic engine failure becomes a reality.
In this comprehensive guide, we will walk through the entire process of replacing a cylinder head, from the initial diagnosis to the final start-up. We will also cover the essential tools you will need and the common pitfalls to avoid to ensure your engine runs smoothly for years to come.
Why Replace a Cylinder Head?
Before diving into the mechanical work, it is vital to confirm that the cylinder head or its gasket is indeed the culprit. Tearing down an engine only to find the problem lies elsewhere is a frustrating and expensive mistake.
Common Signs of Failure
- Persistent Overheating: If your temperature gauge consistently climbs into the red zone, the head gasket may no longer be sealing the cooling passages, or the head itself may be warped.
- White Smoke from the Exhaust: This is a classic symptom of coolant leaking into the combustion chamber. As the coolant burns, it creates a thick, sweet-smelling white vapor.
- “Milky” Oil: Check your oil dipstick. If the oil looks like a chocolate milkshake, coolant has mixed with the engine oil, which can quickly destroy engine bearings.
- Loss of Power and Misfires: A breach in the cylinder head seal leads to a loss of compression, causing the engine to run roughly or lose significant power under load.
- External Leaks: Occasionally, you might see coolant or oil weeping from the seam where the head meets the block.
If you recognize these symptoms, it is time to perform a compression test or a chemical block test (which detects combustion gases in the cooling system) to confirm the diagnosis.
Phase 1: Preparation and Essential Tools
Success in cylinder head replacement is 90% preparation. Because this job involves opening the most sensitive parts of the engine, cleanliness and organization are your best friends.
Required Tools and Supplies
To complete this job, you will need more than just a basic socket set. Ensure you have the following:
- High-Quality Torque Wrench: This is non-negotiable. Head bolts must be tightened to exact specifications to ensure a proper seal.
- Feeler Gauges and a Straight Edge: Used to check the engine block and cylinder head for warping.
- Socket Set (Metric and Standard): Including deep-well and hex/Torx bits depending on your vehicle.
- Breaker Bar: For loosening stubborn, heat-cycled bolts.
- Gasket Scrapers: Preferably plastic or brass to avoid gouging aluminum surfaces.
- Labeling Materials: Zip-lock bags and a permanent marker to organize bolts and small parts.
- New Components: A new cylinder head (or your refurbished one), a head gasket set, and—crucially—new head bolts (most modern engines use Torque-to-Yield bolts, which cannot be reused).
Phase 2: The Disassembly Process
Disassembly is more than just “taking things apart.” It is a process of discovery. As you remove components, inspect them for wear and tear.
1. Safety and Fluid Drainage
Start by disconnecting the negative battery terminal. This prevents accidental shorts or the starter motor engaging while your hands are in the engine. Next, drain the engine oil and the coolant into appropriate containers. Never work on a hot engine; wait at least four hours after driving to begin disassembly to prevent the metal from warping as it cools unevenly.
2. Clearing the Top End
You must remove everything attached to the cylinder head. This includes:
- Intake and Exhaust Manifolds: These can be heavy and awkward. In some vehicles, you can leave the manifolds in the engine bay and simply unbolt them from the head, but usually, removing them entirely provides more room to work.
- Valve Cover: Remove the bolts and the old gasket.
- Wiring and Hoses: Take photos of every electrical connector and vacuum line before disconnecting them. This will be a lifesaver during reassembly.
3. Setting the Engine to TDC (Top Dead Center)
Before touching the timing belt or chain, rotate the crankshaft (using a socket on the crank bolt) until the engine is at Top Dead Center on the number one cylinder. Align the timing marks on the camshaft gears and the crankshaft pulley. This ensures that when you put everything back together, your engine’s timing remains synchronized.
4. Removing the Timing Component
Once at TDC, loosen the tensioner and remove the timing belt or chain from the camshaft sprocket. Secure the chain so it doesn’t fall into the timing cover.
5. The Head Bolt Sequence
This is a critical step. Cylinder head bolts should be loosened in the reverse order of the tightening sequence. This prevents the head from springing or warping as the tension is released. Usually, this means starting from the outside and working your way toward the center in a “spiral” or “criss-cross” pattern.
Phase 3: Inspection and Surface Preparation
Once the head is off, the real work begins. You cannot simply slap a new gasket on and bolt it back together.
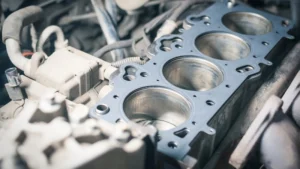
Cleaning the Block Deck
The surface of the engine block (the “deck”) must be perfectly clean. Use a gasket scraper and brake cleaner to remove every trace of the old gasket. Do not use a power sander or a wire wheel, especially on aluminum blocks, as these can create low spots that a gasket cannot seal.
Checking for Warpage
Place a precision straight edge across the block and the cylinder head (if you are reusing the old one). Try to slide a feeler gauge (usually around 0.002 to 0.004 inches, depending on manufacturer specs) under the straight edge. If it passes through, the surface is warped and must be machined.
Inspecting the Cylinder Bores
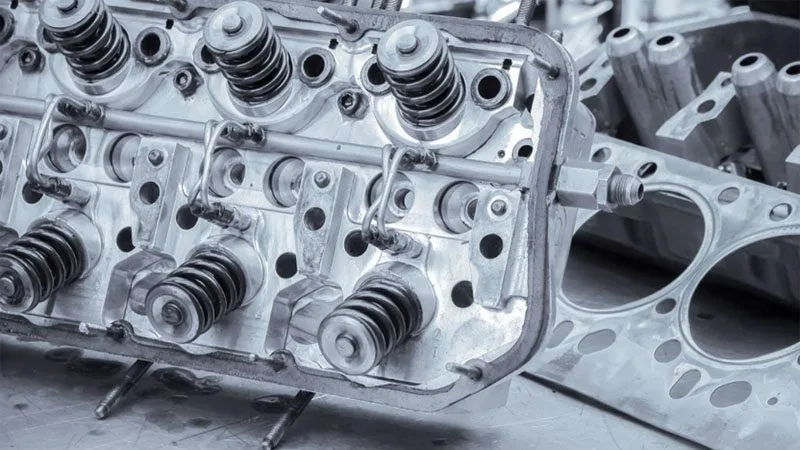
While the head is off, look at the cylinder walls. You should see a “cross-hatch” pattern. If the walls are mirrored or have deep vertical scores, your engine may need a full rebuild rather than just a head replacement.
Phase 4: Installing the New Cylinder Head
This is the most delicate part of the operation. The goal is to create a permanent, high-pressure seal.
1. Prepare the Bolt Holes
Use compressed air or a shop vac to clean out the bolt holes in the engine block. If there is oil or coolant trapped in the bottom of a hole, installing a bolt can cause “hydraulic lock,” which can crack the engine block as you tighten the bolt.
2. Position the Gasket
Place the new head gasket onto the block. Most gaskets are marked “Top” or “Front.” Ensure all oil and coolant passages align perfectly. Do not use gasket sealer unless the manufacturer specifically instructs you to do so; most modern multi-layer steel (MLS) gaskets are designed to be installed dry.
3. Seat the Cylinder Head
Carefully lower the cylinder head onto the block. It is helpful to have a second set of hands for this to ensure you don’t slide the head across the gasket, which could damage the delicate sealing layers.
4. The Torque Sequence
Apply a light coat of engine oil to the threads and under the heads of the new bolts (unless they come pre-lubricated). Following the manufacturer’s specific sequence—usually starting from the center and working outward—tighten the bolts in multiple “steps.”
- Step 1: Initial torque (e.g., 30 ft-lbs).
- Step 2: Secondary torque (e.g., 60 ft-lbs).
- Step 3: Angle torque (e.g., turn an additional 90 degrees).
Using a torque angle gauge is vital here. This stretches the bolt to its optimal clamping force.
Phase 5: Reassembly and First Start
With the head securely torqued, you can begin the process of putting the puzzle back together.
- Reinstall Timing Components: Align your marks perfectly. Rotate the engine by hand two full turns to ensure there is no mechanical interference between valves and pistons.
- Manifolds and Plumbing: Reinstall the intake and exhaust manifolds with new gaskets. Reconnect all vacuum lines and electrical sensors using your reference photos.
- Refill Fluids: Pour in fresh oil and a 50/50 mix of coolant.
- The “Dry” Crank: Disconnect the ignition or fuel pump fuse and crank the engine for 10 seconds. This builds oil pressure and circulates lubricant to the top end before the engine actually fires up.
- The Start-Up: Replace the fuse and start the engine. It may stumble for a moment as air is purged from the fuel lines.
Post-Installation Care
After the engine has reached operating temperature, check for leaks. It is common to see a little smoke from the exhaust manifold as residual oils burn off. Monitor the coolant level closely over the next few days, as air pockets may “burp” out of the system.
It is also recommended to change the oil again after the first 500 miles. This ensures that any tiny bits of debris or cleaning agents that entered the system during the repair are flushed out.
Conclusion
Replacing a cylinder head is an intensive task, but by following a structured approach and respecting the technical specifications of your engine, you can restore your vehicle’s performance and save thousands of dollars in shop labor. Accuracy and cleanliness are the hallmarks of a successful repair.
At XinJin Auto Parts, we understand the precision required for engine maintenance. As a dedicated factory specializing in high-quality engine components, we provide the reliable parts you need for a perfect fit. For inquiries or bulk orders, please feel free to Contact Us anytime.