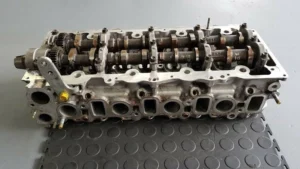
The cylinder head is often described as the “lungs” of an internal combustion engine. It controls the inflow of air and fuel and the outflow of exhaust gases. Over time, however, the intense heat and chemical reactions of combustion leave behind a mess: carbon deposits, baked-on oil sludge, and stubborn gasket residue.
For any mechanic, engine builder, or DIY enthusiast, knowing how to properly clean a cylinder head is not just about aesthetics—it is a critical step in ensuring the longevity and efficiency of the engine. A dirty head can lead to poor sealing, hotspots that cause detonation, and restricted airflow.
In this guide, we will walk you through the professional-grade process of cleaning and prepping a cylinder head at home. We will cover the differences between aluminum and cast iron heads, the tools you need, and the inspection steps that often save thousands of dollars in wasted labor.
Why Cylinder Head Hygiene Matters
Before diving into the “how-to,” it is important to understand the “why.” Search engines and readers alike value context.
When an engine runs, carbon builds up on the valves and inside the combustion chamber. This buildup effectively increases the compression ratio in a chaotic way and creates uneven surfaces that retain heat. These “hotspots” can cause pre-ignition (knocking), which destroys engines. Furthermore, old gasket material left on the deck surface will prevent a new head gasket from sealing properly, leading to the dreaded “blown head gasket” shortly after a rebuild.
Cleaning the cylinder head returns the airflow characteristics to factory specifications and ensures a perfect mating surface for the engine block.
Phase 1: Preparation and Safety
Cleaning an engine component involves both chemical and mechanical processes. You must identify the material of your cylinder head before touching it with a tool.
Identify Your Material: Aluminum vs. Cast Iron
- Cast Iron: Durable and heavy. It can withstand more aggressive cleaning methods, such as steel wire brushes and caustic hot tanks.
- Aluminum: Lightweight and standard in most modern cars.
- Crucial Warning: Aluminum is soft. Distinctly, it is sensitive to pH. You generally cannot use steel wire brushes (which will gouge the metal) or highly caustic oven cleaners (which can eat away the aluminum).
The Tool Kit
To do this job effectively without a machine shop, you will need:
- Safety Gear: Nitrile gloves, safety goggles (chemical splash), and a respirator if working with strong solvents.
- Scrapers: A gasket scraper (carbide or steel) for iron heads; a plastic or composite scraper for aluminum heads.
- Brushes: A set of nylon brushes, and specifically brass wire brushes for aluminum. Steel brushes are strictly for cast iron.
- Solvents: Brake cleaner, engine degreaser, and a carbon remover (or specialized parts washer fluid).
- Abrasives: Scotch-Brite pads (use with caution on gasket surfaces).
Phase 2: Disassembly and Initial Degreasing
You cannot properly clean a cylinder head while it is fully assembled. The valves hide the valve seats, and the seals trap oil.
- Organize Components: As you remove valves, springs, retainers, and lifters, keep them in a labeled organizer. Valves wear into their specific seats; mixing them up will ruin your valve job.
- Remove Sensors and Plugs: Take out spark plugs, temperature sensors, and freeze plugs if you are planning a deep dip.
- The Initial Degrease: Before tackling the hard carbon, get rid of the “soft” sludge. Place the head in a large plastic tub. Apply a liberal amount of engine degreaser. Agitate the oily areas with a nylon brush.
- Pressure Wash: If you have access to a pressure washer, rinse the head thoroughly to blast away the loosened sludge. If not, a garden hose with a high-pressure nozzle will suffice. Dry the head immediately with compressed air to prevent flash rust on iron surfaces.
Phase 3: Removing Carbon Deposits
This is the most labor-intensive part of cleaning a cylinder head. Carbon deposits in the combustion chamber and exhaust ports are baked on by thousands of explosions.
The Soaking Method
Mechanical scraping alone is risky. Chemical softening is preferred.
- Apply a carbon-removing solvent or a dedicated gasket remover spray to the combustion chambers and exhaust ports.
- Let it sit for the time recommended by the manufacturer (usually 15–30 minutes). You should see the carbon begin to bubble or soften.
The Mechanical Scrub
Once softened, use your scraper to gently lift the bulk of the carbon.
- For the Ports: Use a rotary tool (like a Dremel) with a brass wire wheel to clean inside the intake and exhaust ports. This improves airflow.
- For the Valves: If you are reusing valves, mount them in a drill press (tape the stems to protect them) and use a mild abrasive pad to polish the carbon off the valve face.
- The Combustion Chamber: Use a brass hand brush to scrub the remaining carbon. The goal is to get down to bare metal without scratching the surface. Smooth surfaces resist future carbon buildup better than rough ones.
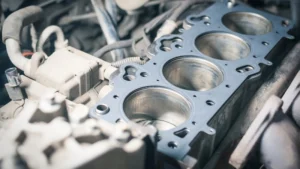
Phase 4: The Deck Surface (The Critical Zone)
The “deck” is the flat surface of the cylinder head that mates with the engine block. This is the most critical area. A scratch here that is deep enough to catch your fingernail is deep enough to leak coolant or compression.
- Chemical Removal First: Use a gasket remover spray to soften the old gasket material. Never try to “dry scrape” a rock-hard gasket; you will slip and gouge the metal.
- Gentle Scraping: Hold your scraper at a low angle (under 30 degrees). Push away from you. If you are working on an aluminum cylinder head, we highly recommend using a plastic razor blade or a dedicated chemical gasket remover to avoid removing metal.
- Final Buffing: Many mechanics use a conditioning disc (Ro-Loc disc) on a die grinder. Exercise extreme caution. These discs can remove aluminum faster than you realize, creating a wavy surface that looks shiny but is uneven. A safer method for DIYers is a large sanding block with fine-grit wet/dry sandpaper (400 grit or higher), using a solvent as a lubricant, moving in a figure-eight pattern to ensure flatness.
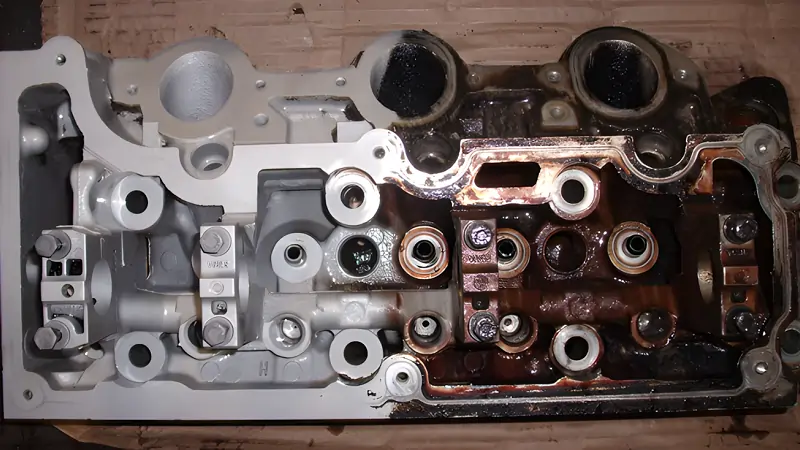
Phase 5: Cleaning Oil Galleries and Water Jackets
A visually clean exterior means nothing if the internal passages are clogged. Debris from the cleaning process often ends up inside the oil galleries.
- Tube Brushes: Use long, thin bottle brushes (like those used for cleaning firearms) to scrub the oil passages.
- Flush: Spray brake cleaner through every oil port. You want to see clear fluid coming out the other side.
- Compressed Air: Blow high-pressure air through every passage. This is non-negotiable. A single metal shaving left in an oil gallery can destroy a cam bearing upon startup.
Phase 6: Inspection and Verification
Now that the cylinder head is clinically clean, you must verify it is actually usable. Cleaning often reveals cracks that were hidden by grime.
Checking for Warpage
Overheating causes metal to expand and warp. A warped head will never seal.
- Get a precision straight edge and a set of feeler gauges.
- Lay the straight edge across the deck surface diagonally, lengthwise, and widthwise.
- Try to slide the feeler gauge under the straight edge. Consult your engine’s service manual for the tolerance (typically around 0.003 inches). If the gauge slides under, the head needs to be resurfaced by a professional machine shop.
Crack Testing
For cast iron, magnetic particle inspection (Magnaflux) is the standard. For aluminum, a dye penetrant test is used. You can buy DIY dye kits. You spray a dye, wipe it off, and then spray a developer which pulls the dye out of microscopic cracks, making them visible as bright red lines. Common crack areas are between the valve seats.
When to Replace vs. Repair
Sometimes, no amount of cleaning can save a cylinder head. If you discover deep cracks, excessive warpage that exceeds the resurfacing limit, or severe corrosion in the water jackets, replacement is the only viable option.
Additionally, if the valve guides are worn beyond limits, the cost of machine work to rebuild the head might exceed the cost of purchasing a new, factory-assembled unit.
Conclusion: The Foundation of a Healthy Engine
Cleaning a cylinder head is a messy, time-consuming job that demands patience and attention to detail. However, it is one of the most rewarding aspects of engine building. A clean head flows air efficiently, seals compression perfectly, and allows your engine to perform at its peak potential.
By following the steps outlined above—respecting the metallurgy, using the right chemicals, and obsessively checking for flatness—you ensure that your engine rebuild will stand the test of time.
Reliable Solutions for Your Engine Needs
While cleaning and refurbishing is a great way to save money, there are times when a cylinder head is simply too damaged to be safely reused. Cracks, deep corrosion, or warped sealing surfaces can turn a rebuild project into a nightmare.
If you find that your cylinder head needs replacement, or if you are looking for a high-quality unit to start your build, look no further than XINJIN Auto Parts.
We are a dedicated factory specializing in the manufacturing of premium cylinder heads. By buying directly from us, you eliminate the middleman, ensuring you get factory-direct quality at highly competitive prices. Whether you need a replacement for a passenger vehicle or a heavy-duty application, our team is ready to support you.
Need a quote or technical advice? Contact Us Today to find the perfect cylinder head for your engine. Quality products, factory prices—XINJIN Auto Parts is your trusted partner in engine restoration.